Andes Mint Cake | How to Make a Chocolate-Mint Whipped Cream Cake
Every editorial product is independently selected, though we may be compensated or receive an affiliate commission if you purchase something through our links. Ratings and prices are authentic and items are in stock equally of time of publication.
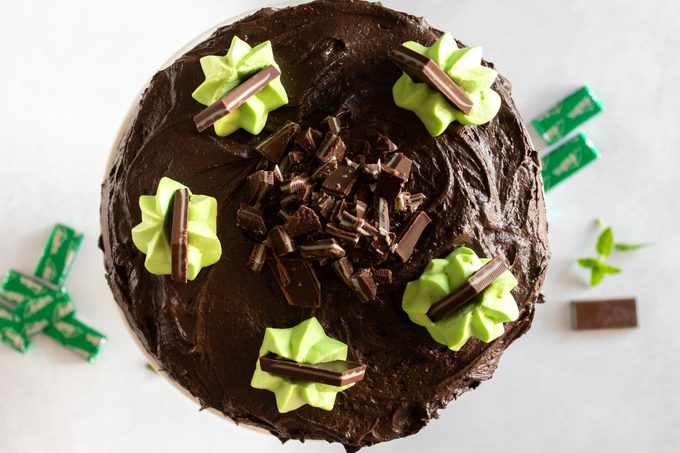
This vintage Andes chocolate cake is layered with dreamy layers of mint whipped foam. Hither'south how to make it!
This pretty dessert is for all the chocolate mint lovers out there, the ones who clamor for mint fleck water ice foam and can't await for the Girl Scouts to deliver Thin Mints. The people who, like me, steal all of the after-dinner Andes mints that go far with the Olive Garden bill!
Here'south a decadent Chocolate-Mint Whipped Cream Cake that was simply made for us. This vintage recipe originally appeared in a 1968 event of The American Home, a pop magazine that was published until the late '70s.
What's in This Layer Cake?
The filling in this Andes mint cake is a green, lightly minty whipped cream. It gets sandwiched between rich, chocolate cake layers before the whole matter is covered in fluffy chocolate frosting. To make the cake even more than candy-like, I added chopped Andes chocolates between the layers and on the peak!
I did change the chocolate frosting from the original recipe. In the original recipe, the frosting ingredients include a whole egg. This may take been acceptable in the '60s, but these days I'd rather not hazard having raw egg in my frosting! Instead, I went with this piece of cake Rich Chocolate Frosting, cut the recipe in half. It made enough to frost this block.
How to Make Andes Mint Block
There are three elements here: chocolate cake layers, mint whipped cream and chocolate frosting. The cake needs to chill for an hour before it's frosted, and so allow for that extra time. This gorgeous iii-layer block serves eight.
Ingredients
- 1-1/2 cups all-purpose flour
- 1 teaspoon baking soda
- 1/two teaspoon table salt
- 1/iv teaspoon baking pulverization
- ane/2 cup unsalted butter, softened
- 1-1/4 cups granulated sugar
- 2 eggs, room temperature
- 1/2 loving cup cocoa pulverization
- i cup hot water
Editor's Tip: Forgot to gear up your butter out? Here are several quick ways to soften butter.
Whipped Cream Filling:
- two cups heavy cream
- ane/4 cup confectioners' sugar
- i-1/2 teaspoons peppermint extract
- Green nutrient coloring
- 28 Andes Creme de Menthe Thins candies
Chocolate Frosting:
- 1 cup unsalted butter, softened
- four cups confectioners' sugar
- 1-ane/4 cups cocoa pulverization
- 1/iv teaspoon vanilla extract
- ane/iv teaspoon peppermint extract
- i to 1-one/4 cups whole milk
Tools You'll Need
Directions
Step ane: Make the cake batter
Preheat the oven to 350°F. Grease and flour iii 8-inch round cake pans. Sift together the flour, blistering soda, salt and baking pulverisation into a medium bowl and set aside. (Hither'due south what do if you don't accept a sifter.) Use a stand mixer to beat together the i/two cup of softened butter and granulated sugar for three minutes.
Add in the eggs and beat for five minutes more until the mixture is very lite.
Stir the one/two cup of cocoa pulverisation into the hot water until it'southward dissolved. Add the flour mixture to the butter and eggs, alternating with the cocoa water, running the mixer on low speed. Scrape the bowl once or twice, and only mix until the ingredients are simply combined.
Pace 2: Bake the cakes
Separate the batter between the iii prepared pans. Pop them in the oven and bake for about 25 minutes, until the cake springs back when lightly touched. Cool the cakes in the pans for 10 minutes, and so advisedly remove them from the pans to finish cooling on a wire rack.
Step 3: Make the whipped cream
Pour the heavy cream into a mixing bowl. Whip the cream at high speed until information technology only starts to thicken. Add together in the 1/iv cup of confectioners' sugar, ane-1/2 teaspoons of peppermint extract and a few drops of green food coloring. Whip the cream until stiff peaks form. (Add another drop or ii of food coloring if necessary to get the correct shade of green.) Agree the finished whipped foam in the fridge.
Step 4: Fix the Andes candies
Set aside five of the Andes thin mint candies. Unwrap the rest, place them on a cutting board, and utilise a abrupt knife to chop them into pocket-sized pieces. Divide the chopped candies into three portions.
Step five: Get together the block layers
Place one of the cooled block rounds onto a block plate. Scoop one loving cup of the whipped cream filling into a modest dish (to save for a finishing touch) and put it back in the fridge. Spread half of the remaining filling evenly over the cake. Sprinkle one of the portions of chopped candies over the cream. Carefully place a cake circular on the filling. Spread the residue of the filling over the cake, and sprinkle some other portion of chopped candies over it. Finally, identify the last cake circular on the top. Put the block into the fridge to chill for one 60 minutes.
Step 6: Make the chocolate frosting
Beat 1 loving cup softened butter in a big bowl with a mixer on high speed, until it's smooth and creamy. Sift in the four cups of confectioner's sugar and one-1/iv cups cocoa pulverization. Add in the 1/4 teaspoon of vanilla extract and ane/4 teaspoon of peppermint extract. Run the mixer on low speed to bring everything together. Gradually add together in the milk while mixing until the frosting reaches a practiced spreading consistency. Then, beat the frosting on high speed for v minutes until it's low-cal and fluffy.
Step 7: Frost and decorate the block
When the cake is chilled, run a pocketknife around the outside to make sure the cream filling is fifty-fifty with the cake layers. Utilise an offset spatula to frost the top and sides of the cake with the chocolate frosting. Pour the remaining portion of chopped Andes candies into a mound in the top center of the cake.
Take the ane cup of reserved whipped cream and make five dollops effectually the summit of the cake. (You can do this with a piping bag and big tip, or just use a spoon.) Finally, unwrap the 5 reserved Andes mints and stick one into each of the dollops of whipped cream. Concur the finished block in the fridge until you're set to serve.
Here's What I Thought
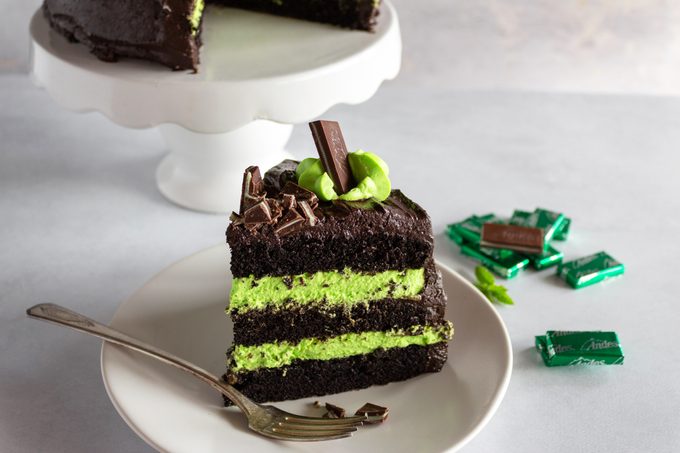
I love chocolate mint, so naturally I loved this Andes mint cake! The block layers were thin, but they worked well with the corporeality of whipped foam that gets layered between them. And having a bite of Andes mints with every forkful of cake was dee-lightful. The chocolate frosting has the perfect corporeality of sweet and creaminess to bring the whole cake together, and everyone who tried this block especially loved that frosting.
As much as I relish mint I did take to cutting back on the mint extract in the whipped foam. The original recipe chosen for three teaspoons, an amount that made the cream gustation bitter. Cutting the excerpt back to 1-1/2 teaspoons was a better level of peppermint.
This Andes mint cake is a lovely dessert that comes together hands and would be fun to brand for birthdays or holiday gatherings. Store this cake covered in the fridge for up to 5 days. The slices gustatory modality just every bit succulent when cold!
Vintage Cakes Like Grandma Used to Make

Old-Fashioned Carrot Block with Cream Cheese Frosting
A pleasingly moist block, this treat is the ane I requested that my mom make each yr for my birthday. It'due south dotted with sweet carrots and a hint of cinnamon. The fluffy buttery frosting is scrumptious with chopped walnuts stirred in. I slice of this homemade carrot cake is never enough—better than all the other carrot cakes recipes I've tried!—Kim Orr, West Grove, Pennsylvania
Psst! These are the cloak-and-dagger ingredients Grandma used to make her cake taste so smashing.

Best Red Velvet Cake
Information technology'due south just not Christmas at our house until this festive cake appears. This is different from other crimson velvet cake recipes I've had; the icing is as lite every bit snow. —Kathryn Davison, Charlotte, N Carolina

Classic Pineapple Upside-Downward Cake
This pineapple upside-down cake is a classic recipe that never goes out of style! It'due south succulent with the traditional pineapple, but effort it with peaches or a combination of cranberries and orange. —Bernardine Melton, Paola, Kansas

Hummingbird Cake
This impressive hummingbird cake is my dad's favorite, so I always make information technology for his altogether. It makes a memorable dessert for any celebration and is lovely with a summertime meal. —Nancy Zimmerman, Cape May Courtroom Firm, New Jersey

Contest-Winning Gingerbread with Lemon Sauce
I asked my mother-in-law for this recipe one time I learned it's my married man'south favorite. Now I bake information technology whenever he needs an extra-special treat. Spice block topped with lemony sauce makes us both grin. —Kristen Oak, Pocatello, Idaho

German Black Forest Cake
Every bit far as I know, this cake recipe can be traced back to my German language smashing-grandma. When I got married, my mother gave me a copy and I promise to someday pass information technology downwards to my children. —Stephanie Travis, Fallon, Nevada

7UP Pound Cake
My grandmother gave me this 7UP pound cake recipe. On top of being delicious, this 7UP cake represents family unit tradition, connection and honey. —Marsha Davis, Desert Hot Springs, California

Moist Lazy Daisy Cake
We e'er called this Mama's "never neglect" recipe. I guess the same holds true for me, since I've entered this lazy daisy cake in contests and won with it. This tasty dessert is pop in our family unit, and it e'er brings dorsum fond memories of Mama. —Carrie Bartlett, Gallatin, Tennessee

Lady Baltimore Cake
I outset made this cake for my fathers' birthday and now it is the only block that he requests. This block has circuitous flavors and is very unique. —Cleo Gonske, Redding, California

Southern Lane Cake
I just love this southern-style dessert, and so practise dinner guests. With pecans, cherries and raisins in the filling and topping, this version reminds me of a fruitcake—only so much better! —Mabel Parvi, Ridgefield, Washington

Gran's Apple Cake
My grandmother occasionally brought over this wonderful block warm from the oven. The spicy apple flavor combined with the sweetness cream cheese frosting made this recipe one that we treasured. Even though I've lightened it upward, it's even so a family favorite. —Lauris Conrad, Turlock, California

Grandma'southward Tandy Kake
My grandmother made this for all our family unit gatherings. Anybody loves it now I go far for every political party nosotros attend or host. —John Morgan III, Lebanon, Pennsylvania

Assistant Cake with Cream Cheese Frosting
As a mother of 3 sons, sweets are a staple in my kitchen! I buy ripe fruit on sale and freeze it to make this cake. My banana cake with cream cheese frosting is a favorite amid loved ones at my family picnics and dinners. —Bonnie Krause, Irvona, Pennsylvania

Coconut Italian Cream Cake
I'd never tasted an Italian cream cake before moving to Colorado. At present I bake for people in the area, and this beauty is one of my most requested treats. —Ann Bush, Colorado City, Colorado

Archetype Tres Leches Cake
Tres leches means "three milks." This cake gets its name considering it uses three kinds of milk—evaporated, condensed and cream. This block's calorie-free and airy texture has fabricated it a archetype in Mexican kitchens for generations. —Taste of Abode Test Kitchen

Best Angel Food Cake
For our girl'due south wedding ceremony, a friend made this lovely, angel food cake from a recipe she's used for decades. It really is one of the best angel food cake recipes I've establish. Serve slices plain or dress them up with fresh fruit. —Marilyn Niemeyer, Doon, Iowa

Walnut Honey Cake
This light and fluffy marvel all but melts in your mouth. Back in the day, it took effort for my grandmother'due south kitchen helper to get in, but it's a breeze now that nosotros take stand mixers. —Lily Julow, Lawrenceville, Georgia

Pumpkin Spice Block with Maple Glaze
Serve up some fun with this delicious block that's yummy whatever time of the twelvemonth, but peculiarly nice during the vacation season. No one will guess that cake mix simplifies the recipe. The traditional pumpkin and spices plus the delectable maple coat give it a existent from-scratch taste. —Barbara Elliott, Tyler, Texas

Kokosnoot Chiffon Cake
Toasted coconut adds visual appeal to this alpine and impressive block. With an airy texture and heavenly coconut-ginger flavour,it's a lovely end to meals throughout the twelvemonth.

Sandy's Chocolate Block
Years ago, I drove four-1/2 hours to a block competition, property my entry on my lap the whole way. But it paid off. One seize with teeth and you'll run into why this velvety beauty was named the best chocolate cake recipe and won kickoff prize. —Sandra Johnson, Tioga, Pennsylvania

Spicy Applesauce Block
This picnic-perfect block travels and slices very well. With chocolate chips, walnuts and raisins, it's a real crowd pleaser. —Marian Platt, Sequim, Washington

Jeweled Fruitcake
I promise this jeweled fruitcake is simply fantastic. Even my friends and family members who don't normally care for fruitcake say they love it! —Sharon Hoffman, Donna, Texas

German language Chocolate Tres Leches Cake
I get-go tried tres leches cake while in Ecuador several years ago. Since then, I've changed it upwards by adding some of my favorite ingredients, namely chocolate and coconut. This version also has a splash of rum for an adults-just treat. —Lisa Varner, El Paso, Texas

Gingered Apple Upside-Down Cake
I similar that this gingerbread delight is so deeply flavored and delicious. Served warm from the oven, a overnice scoop of vanilla edible bean ice cream is definitely the icing on this block. —Raymonde Conservative, Swastika, Ontario

Buttermilk Pound Cake
At present that I've retired from pedagogy, I have more fourth dimension to bake. This buttermilk pound cake is the one I brand most often. Information technology is a truly southern recipe, and one I think can't be topped—once people taste it, they won't go back to their other recipes with buttermilk. —Gracie Hanchey, De Ridder, Louisiana

Glazed Spiced Rum Pound Cakes
My recipe makes two loaf-sized treats, perfect for sharing. The spiced rum flavor really comes through in both the block and the glaze. —Christine Russell, Littleton, New Hampshire

Butter Pecan Layer Cake
Pecans and butter requite this cake the same irresistible flavor equally the popular butter pecan water ice cream flavour. —Becky Miller, Tallahassee, Florida
Source: https://www.tasteofhome.com/article/andes-mint-cake/
0 Response to "Andes Mint Cake | How to Make a Chocolate-Mint Whipped Cream Cake"
Post a Comment